On Vibrato by Laura Jellicoe
The third installation of Conversations with Professor Laura Jellicoe of the Royal Northern College of Music.
What is your approach to teaching vibrato for advanced students? How do you increase their awareness of vibrato, and give them the technical tools to be able to use it as a means of expression?
Hello again to everyone, and greetings from Manchester UK – which I can finally say is sunny!
Vibrato is such an interesting topic - there are so many different styles of flute playing, and each great player uses vibrato in a slightly different and personal way. But there are some things that everyone would agree on, so when starting to work on vibrato with advanced students, we’d first discuss –
‘What is vibrato, and why do we use it?’
Vibrato is a change in pitch, normally slightly either side of the core note.
We use vibrato to add expression to our core sound, so that our tone really ‘sings’ - one of Marcel Moyse’s famous sayings was ‘Never play dead’. Vibrato can change the colour, intensity, and emotion of a note, and we can alter the speed and the depth of the vibrato, depending on what we want to say with the music.
When we sing, we naturally use vibrato to warm the sound, so the idea is that when we use vibrato on our instruments, we imagine what we might do with that particular note or phrase if we were singing it, and we imitate that on our instrument. To develop our awareness of vibrato when making music, I’d recommend students start by listening closely to their favourite singers – for me personally, for their incredible range and control of expression, I’d choose Jessie Norman, Maria Callas, Pavarotti, Domingo, Angela Gheorghiu…. and not forgetting the wonderful Shirley Bassey!
I’d encourage students to analyse the speed and depth of these great singers’ vibrato as they change colour or intensity, and as they crescendo or diminuendo, then try to copy them. We need to be as flexible with our vibrato as possible, according to the demands of the music, and we need to be able to change it at the drop of a hat, so the more we experiment ourselves, and also listen to and copy ‘the greats’, the more possibilities we will have in our ‘vibrato box’. Since ‘imitation is the most sincerest form of flattery’, it’s an idea to listen to these singers, or indeed our favourite flute players, and copy their vibrato – you might be surprised how close you get with practice!
So….onto some exercises. The first thing to say is that I would only work on vibrato once the student is breathing and supporting well. It’s really important to spend time playing with NO vibrato, and I’d suggest spending a few minutes every day playing long notes, slow scales and melodies, following the shape of the phrase without the distraction of vibrato. The ability to play with no vibrato, based on good breathing and support, is key to how well the vibrato will work – the foundations must be in place.
There are lots of vibrato exercises I’d like to share another time, but for starters I would recommend 2 different types of vibrato practice –
- Measured diaphragm bumps with the metronome
- Experimenting with different waves of vibrato
The general idea is that we practice regular vibrato with a metronome until the mechanics are working well, and then we learn to control it and vary it, so that it becomes a form of musical expression and fits the music. There are several ways of teaching this, but my belief is that the energy should firstly come from the diaphragm, to encourage a deep tone and a liveliness in the sound. As this starts working well, and we are able to do the ‘diaphragm bumps’ more quickly (7 bumps per second is generally recognised as the maximum possible), we then allow the vibrato to travel a little higher up our body and let it happen ‘somewhere in the middle’ – we want the diaphragm to still be working, but not over-working, and we want the vibrato to be within the sound.
The exercise I would use when first working on vibrato with a student is playing diaphragm bumps with a metronome, starting very slowly and gradually increasing the number of bumps per second. The most important thing here is to make sure that the bumps are coming from ‘low down’ in our abdominal area, so keep checking this as you practise.
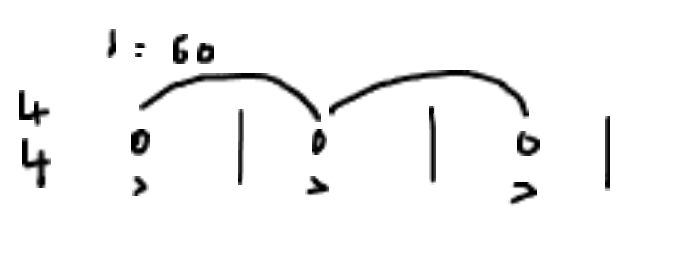
Exercise 1 – Measured diaphragm bumps with metronome
To find out how your diaphragm should be moving during this exercise, say Hah Hah Hah out loud, then play a long low G with the same movement in your tummy and producing 3 ‘diaphragm bumps’. If you have good balance of the instrument, you could put your right hand on your tummy at the same time. For this exercise, we want the movement of the bumps to be fast and deep. Keep repeating this until you are familiar with the movement, then play the following exercise, starting with one bump per 4 seconds.
 Etc.
Etc.
Play this several times with a metronome, and always think about your breathing and posture – maybe refer to last month’s article to remind yourself of the key points.
- Breathe whenever you need to
- Keep your throat open and free
- Find a balanced posture
- Find your support
- Let go of any tension you’re aware of.
- Find the resonance in your sound
- Make sure your tummy muscles are supporting all the way through the note.
- Lead your attention to your tummy area, deep and low down
If the note jumps up an octave, it probably means that your embouchure is a little tight, or the embouchure hole is too small for the amount of air you need for this exercise, so relax your lips a little, drop your jaw and open the embouchure hole. If in doubt, stop playing and say Hah Hah Hah again, to remind yourself of the diaphragm movement.
Next, we play one bump every 2 seconds -
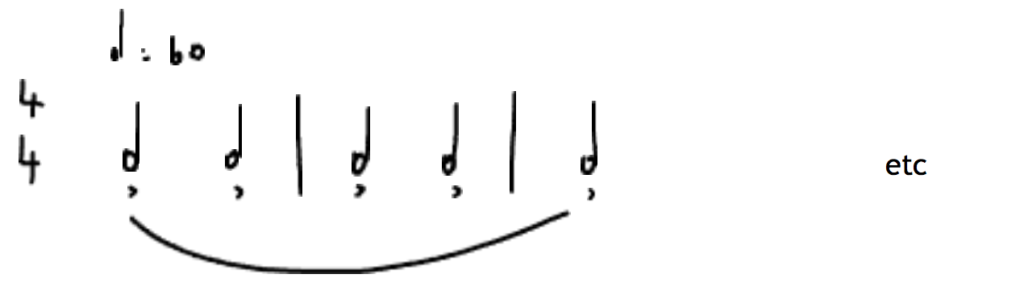
It’s worth doing this for a few minutes, again making sure that the movement is coming from your diaphragm. Then progress to 1 bump per second, 2 bumps per second, 3 bumps, then 4 etc. I would recommend staying on 4 bumps for the first couple of weeks, or longer if necessary. The important thing here is not the speed of the bumps, but WHERE the energy is coming from – it must be from down below!!
When this is working well, increase to 5, 6 and 7 bumps per second, again checking where the movement and energy are coming from. It’s very normal to start tightening and producing the vibrato at the top of the throat – this is known in the flute world as ‘nanny goat’ vibrato, and we definitely want to avoid that! Most of us started off with a nanny-goat vibrato, I know I certainly did, but with time and patience, and with the kind of deep breathing we discussed in the last article, we can learn to let go of that and instead learn to make a singing vibrato which enhances the tone.
Start on a low G, A or B, but feel free to change the note you use every couple of days – each note will respond in a slightly different way. The bumps need to be a little stronger as you go higher up the instrument, so I’d suggest you stay in the low register for the first few weeks.
Exercise 2 – learning about the waves
The next thing to say is that there are 2 main types of vibrato waves – ‘deep’ and ‘shallow’. Each of these can be played ‘slow’ or ‘fast’. This is how the waves look when drawn –
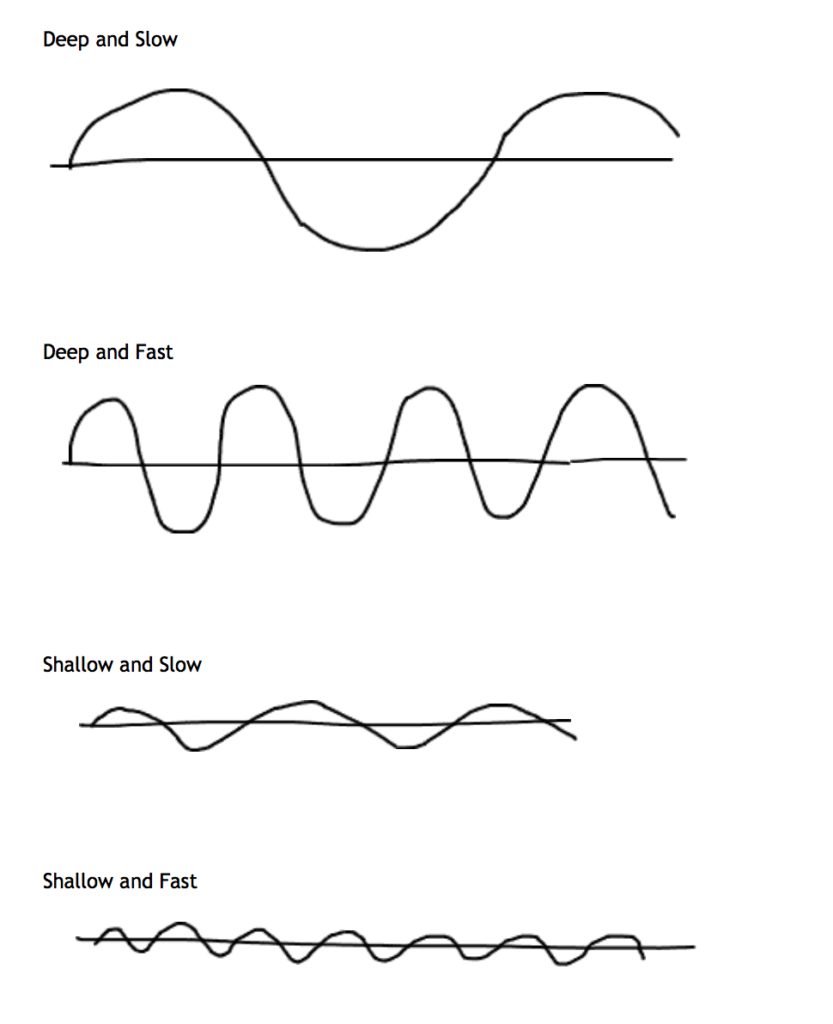
Once you feel the first diaphragm exercise is working well, I would suggest playing long notes with each of the different wave patterns above, and in each register – this is where we start to vary our vibrato and make it sound more naturally expressive. A few words about the two types of bumps –
Deep diaphragm bumps
Allow the pitch to go slightly higher as you blow faster, and slightly lower as you drop the air pressure. For this exercise –
- The movement of the diaphragm can be a little slower and less aggressive.
- Keep the bumps within the sound – the core note should still be the main thing we hear, but with an increase and decrease of air pressure as you work the diaphragm.
- As always, use your best sound, best breathing, best posture.
- Think of the throat as open and free.
Shallow diaphragm bumps
These should be very much within the sound, creating a much gentler vibrato – it is less audible than the deeper vibrato, but it is there to keep the sound alive rather than dead. Support is key here – we need much more support for this type of vibrato, so think about your general support throughout the note, and, as always, make your best, singing tone.
I really hope this is helpful - I would go into more detail in a lesson, and would share more exercises with the student, but for now I would love to encourage everyone to enjoy experimenting with different speeds and depths of vibrato in your practice. Play your favourite tunes from the operas, or use Moyse’s ‘Tone development through Interpretation’ or Robert Winn’s ‘Melodies for developing Tone and Interpretation’ to help. Try playing these tunes with vibrato speeds or depths which you’ve never used before – vibrato is so personal that this will probably feel very strange and will take you away from your ‘norm’. But we only live once, so go for it - hopefully you will find something that sounds rather good, and it will be unique to you!
Laura’s career as a flautist has taken her all over the world, playing with many of the UK’s top orchestras and ensembles. She won 1st prize in the 1992 British Flute Society’s International Young Artist Competition, chaired by Sir James Galway, joined the Royal Liverpool Philharmonic Orchestra at only 22, and is currently Principal Flute with the English Symphony Orchestra.
She has also played with orchestras such as the BBC Symphony, including at the ‘Last Night of the Proms’ and many other Proms concerts, and the Academy of St. Martin-in-the-Fields, with whom she has toured Europe. She has broadcast on radio and tv many times, and can be heard on recordings such as the complete Beethoven Symphonies with Sir Charles Mackerras, the Bax Symphonies conducted by Vernon Handley, Delius with Richard Hickox, and Faure, Kodaly, Nielsen with the RLPO.
Alongside playing, Laura has a real passion for teaching, and for passing on what she has learnt both in the profession and from her previous tutors (Michael Cox, Clare Southworth, Peter Lloyd, Richard Davis, Kate Hill). She had 10 wonderful years teaching at the internationally renowned Chetham’s School of Music, and is now Head of Flute at the Royal Northern College of Music in Manchester, following in the footsteps of Trevor Wye and Peter Lloyd. Her goal when teaching is to try to bring out the expressive voice of each individual student – this involves letting go of all tension, finding good posture and balance, developing a relaxed breathing technique, and developing resonance. Many of her ex-students are now enjoying professional orchestral positions or a busy freelance career, and one of her greatest joys is turning up to a gig to find herself sat next to one of them!
Laura has given many masterclasses over the years to students at the UK conservatoires and universities, including the Royal Academy of Music in London, and also to students in New York, Hong Kong, Italy, London etc, and she is currently setting up her own flute course. She is also a conductor, and has coached many orchestral youth Wind sections, working regularly with musicians from Chethams, the National Youth Orchestra of Great Britain, and RNCM. She has been on the panel for competitions such as BBC Young Musician of the Year, the British Flute Society and Feis Coeil competition in Dublin.