Qigong Standing Meditations for Healthy Flute Posture
by Betty Bang Mather
Act without doing,
work without effort.
—Tao Te Ching, #63
(Stephen Mitchell’s English version)
For a recital in the early 1990s I played one piece on piccolo, one on flute, one on alto flute, one on bass flute. This was a special challenge for me since at that time I had little experience with either the alto or bass flute: both were bigger, longer, and heavier than the concert flute I was used to. For the alto flute, I chose to play an especially challenging piece, Harvey Sollberger’s unaccompanied, 12-tone, 15-minute, 17-page “Hara.” Hara is the Japanese word for ‘belly’ and also the title of an early book on Zen Buddhism that Harvey and I read. Hara’s lengthy glossary of breath sounds, and finger slides and slaps, derived from the Japanese shakuhachi (end-blown bamboo flute favored by Zen monks), added their own challenges. But I must have veered from the Zen path while learning the piece, for when I first performed it, my right arm slowly and steadily slithered to half mast. Next morning I could barely swing that dangling arm an inch or two forward or back. The first doctor I saw recommended rotator cuff surgery. The second thought the cuff not torn but “just a little tired from all that flute playing.” He sent me to Physical Therapy and, over time, my rotator cuff released its tired tensions and healed.
Many professional flutists probably have similar stories to tell. Our asymmetrical posture, even for the concert flute, is naturally stressful so must somehow be balanced. Although our bodies differ in many ways, Qigong Standing Meditations can help each of us find our path to a healthy flute posture.
What Is Qigong?
The Chinese word “Qi” (pronounced “chee”) means air, breath, life force, life energy. in Chinese philosophy, medicine, and religion, Qi is the life force that circulates in every living thing and in the air around us. The Chinese word “Gong” means cultivation, skill, mastery. Qigong is the traditional Chinese medical art that works to strengthen the life force in both sick and well persons.
Strange as it may seem, the Chinese medical art Qigong is closely related to the Chinese soft martial art Tai Chi. Often the two overlap to the point they group as one: Tai Chi Qigong (TCQ).
Almost all TCQ sources give detailed instructions for standing. Many include the two basic Qigong standing meditations, “Stand like a Tree” and “Holding the Orb.” Master Lam Kam Chuen’s book, The Way of Energy, offers nine standing positions.
Qigong standing meditations can help flutists’ posture in several ways. Like other Qigong practices, they focus our attention on our bodies from inside out with the key Qigong principle of “non-doing.” Like other standing practices, they strengthen our legs and torsos, correct our alignments, and balance our heads atop our spines. Like other meditative practices, they give our mind and body time to relax, integrate, and reorganize; and they slow and deepen our breathing, calm the restless chattering in our brains, sooth the tumultuous emotions in our hearts, and release long-held tensions in our musculature and nervous system.
Non-Doing: wu wei
The two little Chinese words wu wei translate into English as “non-doing” or “no effort.” These are Chinese yin/yang contradictions. The yin “non” and “no” are shadowy, passive, negative; the yang “doing” and “effort” are sunny, active, positive. But Ancient Chinese philosophers always teach moderation, so there is some yang (doing/effort) in the yin (non/no), and some yin in the yang.
“Non-doing” does not mean doing nothing, and “no effort” does not mean using no effort. Rather, these two contradictions denote accomplishment achieved, not by great exertion, but through inner awareness, intention, active relaxation (letting go), curiosity, kindness, and patience. According to Lao Tzu, “In non-doing, nothing is left undone.”
The yin-yang symbol perfectly illustrates the moderated yin/yang contradiction. A wave of dark yin swirls intimately with a wave of bright yang. But a spot of bright yang lightens dark yin, and a spot of dark yin softens bright yang.
Pushing our effort toward 100% is always stressful and often dangerous. Let us never grin and bear it, but always STOP if we feel even the tiniest twinge of pain. Instead, let us stand comfortably erect with “just enough, not too much” effort to just barely withstand the downward pull of gravity.
Active Relaxation
How do we manage to use just enough, not too much effort? The answer is another contradiction: “active relaxation” (relaxed action). Yin letting go moderates yang efforting.
Let us explore active relaxation first while sitting.
- Sit in a straight chair with your hands in your lap, palms resting on your thighs.
- Relax for a minute or two.
- Invite the index finger of your dominant hand to rise about an inch above your thigh. Invite it to lower to your thigh. What do you notice? What did you feel? If you don’t remember, repeat the two actions with more awareness.
- Now do the same with less effort. That is, relax the finger before you lift it, then use just enough effort to raise the finger a tiny bit while still relaxing it, and continue the tiny effort until the finger is about an inch above your thigh. Allow your raising effort to be just a little greater than your downward relaxation. To lower the finger, see if you can let the downward relaxation be just a little greater than the raising effort. What do you notice? What did you feel?
- Practice the above with your non-dominant finger.
Now let us explore active relaxation while standing.
- Stand comfortably with your arms relaxed at your side, your fingers slightly curled.
- “Relax your body.”… “Relax your thoughts.”… “Relax your breath.”
- Invite the index finger of your dominant hand to move up almost to your thumb. Invite it to return to its starting place. What do you notice? What did you feel? If you don’t remember, repeat the two actions with more awareness.
- Now do the same with less effort. That is, relax the finger before you move it, then use just enough effort to move it a tiny bit while still relaxing it, and continue the tiny effort until the finger is almost to your thumb. Allow your upward effort to be just a little greater than your downward relaxation. To return the finger, see if you can let the inward relaxation be just a little greater than the outward effort. What do you notice? What did you feel?
- Practice the above with your non-dominant finger.
The upward movement of your index finger toward your thumb while you stand requires less effort than its movement away from your thigh while you sit. This is because the muscles on the palm side of your finger are stronger than those on the back side. The point of all this is to make you aware of your sensitiveness to small actions and small efforts. Now that you know what the point is, allow yourself to repeat the above two explorations to learn just how and where in your body you sense these small actions and efforts. For while standing still in the Qigong Standing Meditations, you’ll want to be aware of even such very small actions and efforts, whether in your hands, spine, eyes, or belly.
First studies in Tai Chi
During the month of May 1992, my late husband Roger Mather and I were performing and teaching flute in Shenyang, China. Here’s a photo of Roger and me one morning at 5:00 a.m. in the Shenyang University Park. What do you infer from the stances of Roger, myself, and the fine old tree just in back of me?
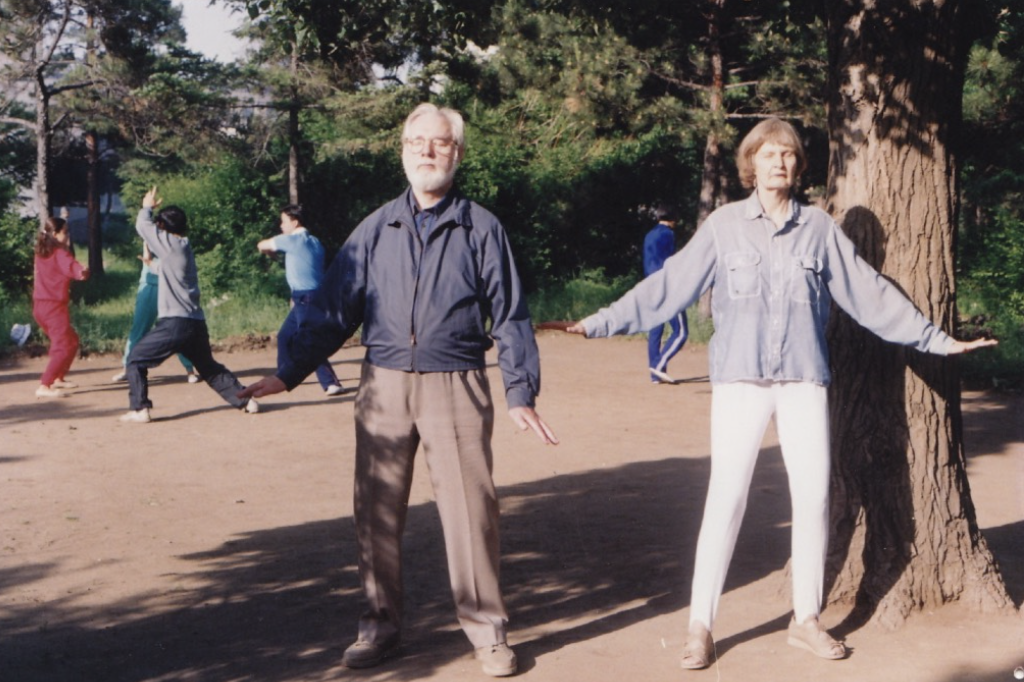
Roger’s arms open slightly from his body in an “A-frame” posture, but his hands flare out a little more, as if to help him keep his balance. His feet however are relaxed and well grounded. His shoulders are relaxed, his chest soft, and the two sides of his body symmetrical. His face is relaxed and open to whatever comes. But his chin is a bit high, and his occiput (lower back of head) sits rather heavily on his spine.
Figure 2. Occiput
In contrast, I look like the meditation,“Stand in a Stream.” I bravely face the oncoming current, but my feet are not well grounded, my left foot pointing out from my right foot. My hands seek support on the imaginary surface of the stream. My shoulders are raised and my neck and jaw stiff (common signs of NOT letting go). My forehead shows a bit of stress, trying to be cool in this strange pose (or strange land?). But my occiput is raised and my chin nicely parallel to the ground.
Meanwhile, the tree stands sturdy and stable. Its roots bore deep into the earth; its branches stretch out to offer shade, and then reach high into the sky.
Virtual TCQ through 2020-2021 Pandemic
Much later, when Tai Chi classes stopped meeting in person during the 2020-2021 pandemic, I began alternating my daily work-outs between two YouTube videos, “Standing Tai Chi Calisthenics” and “Traditional Tai Chi Elements.” Both videos were then and still are taught by Peter Wayne, PhD, Harvard Medical School research professor, and author of The Harvard Medical School Guide to Tai Chi. After a few months I enrolled in Peter’s zoom Qigong class and his zoom Level I Tai Chi class. The Qigong class was my formal introduction to Qigong.
Before the pandemic I had often fallen, but once I started the TCQ exercises, I fell no more. I credit TCQ for that happy outcome. Also, the positive TCQ body shapes; the gentle, circular flow of TCQ choreographies; and the kindness, patience, and curiosity of TCQ teachings kept me ever upbeat and optimistic. If something in my life went awry, I’d just tell myself, “That’s okay!” and take the misfire as an invitation to explore something else.
One day Peter led our zoom Qigong class through a standing meditation that felt particularly easy and comfortable to me.
Later I realized that that particular pose was close to the normal flute posture, so of course it felt natural to me, a longtime flute player.
But wait! That standing meditation was indeed shaped like the normal flute posture, but it felt much easier, lighter, and wonderfully peaceful. Incredibly, neither standing up nor bringing the flute to my lips seemed to require any effort at all. Previously, as I played a phrase, my arms and flute would gradually sink as my breath petered out. But with each phrase since then, my arms and flute drift effortlessly forward and up, keeping my head easy, my breathing free, and the music flowing ever onward. What Peter taught that day changed my flute posture and playing habit forever.
That experience led me to write this article, in hopes that the posture of other flutists might be guided by moving through several Qigong standing meditations to a healthy flute posture.
In his Harvard Tai Chi book, Peter choses words and phrases with care, to the extent that many recur almost as ritual in his zoom classes. In this article I often set Peter’s sayings in quotation marks, both to make them stand out and to give him credit.
Routine for Qigong Standing Meditations
Before standing to meditate we warm up for 5 to 10 minutes to get our Qi flowing. For a minimal warm-up, we stand a moment to get the feel of standing. Then we slowly pour our weight from one leg to the other, our body swaying side to side. After awhile, when our weight is most directly over one foot, we rotate our torso as a cylinder over that foot, letting our arms swing freely back, forth, and around. Then we let each forward-swinging hand tap our opposite upper chest, then side of ribs, side of navel, side of lower abdomen.
After the warm-up, we study the instructions for the day’s standing meditation. We memorize the first few sentences and practice the memorized sentences. Then we memorize the next few and practice them.
During the first several weeks we practice Standing Meditation 1. When our body tells us it’s time for further challenge, we add a second, then a third, then a fourth. Some days we spend all our time on one meditation, other days on two or three. Each day, we let our body tell us when to stop. On some days we feel like falling back to a shorter length of time. That’s okay.
At the end of each day’s meditation, we cool down for 5 to 10 minutes. Here is Peter’s ritual cool-down.
- Stacked palms massage belly in circles.
- Two fists massage lower back in circles.
- Finger tips gently tap back of neck, skull, forehead, temples, face, and jaw.
- Fingers or soft fist slap down inside of opposite arm to finger tips, then up outside of arm to shoulder, three times.
- Fingers or soft fists slap down from kidneys (directly back of navel) as far down the outer legs as can safely be reached, and then back up the inner legs and around to the kidney, three times.
- Arms drop and hands cross at wrists, right under left. Connected hands rise over head, part to opposite sides, palms down, and gently float like little parachutes to land stacked on belly.
While Standing
With curiosity and kindness we explore the inner regions of our body. Some days we start with the crown of our head and move down through our torso and legs to our feet. Other days we start with our feet and move up to our head. We may close our eyes gently or keep them open in a soft gaze.
As we scan our body, we invite it to relax, invite our thoughts to relax, invite our breath to relax. “Don’t judge.” “Don’t try to fix anything,” “Don’t even think much.” Just pay attention to what you feel.
In time, weak points may take care of themselves. Peter says that “just showing up and being present, without trying to change anything, is one of the most challenging and deepest principles of Tai Chi.” In fact, healthy change does happen without our intention. Perhaps involved is the quality of our attention — non-judging, curiosity, kindness, patience. An intention to change that lacks these qualities can make us miss the finer points we see only with the “soft inner gaze.”
During meditations we pay attention to our breathing. “Do you feel where your breath is going?” “Do you feel where it's not going?” The softer and lighter your body the deeper your breath sinks.
Are you aware of any “squeezings” here or there in your body? Squeezings damp energy vibrations. Gently place your attention on squeezed places just as you might place a reassuring hand on the shoulder of a friend.
Almost constantly we check that our feet feel the ground, our head is “bobbilacious,” and that we are breathing. Can you imagine standing on a planet with less gravity than our Earth?…less pressure on our joints?
Let go all thoughts of the future and concerns about the past, bring attention into the present moment. Whenever your attention wanders, gently bring it back to the meditation. Just stand. “You are safe.” “The coast is clear.”
As habitual holding patterns release, do you sense more room for new energy to enter? Because our body changes from moment to moment, we need to be constantly “present” and “aware” in order to get to know it at each instant.
Little by little, you may sense a gentle tingling, pulsing, or even throbbing energy in your hands, fingers and even deep in your body. Peter often tells us to “Trust the Qi to move from where there’s more to where there’s less.”
Each new Standing Meditation may be a daunting challenge until we start to release our Qi blockages. In time, however, our weighted bones strengthen, our stressed muscles let go and, with awareness, curiosity, kindness and patience, we find ways to use less and less effort to stand and play the flute.
Standing Meditation I. ”Stand like a Tree”
“Stand Like a Tree” is an ideal practice for helping flutists become aware of their bodies from the inside. It gives us time to strengthen our feet, ankles, and legs; align our limbs and torsos; let go unwanted tensions; and improve our balance.
This is the shape for Standing Meditation 1.
 Figure 3. Stand like a tree.
If possible, we practice this meditation near a strong, upright tree in nature, or near an open window that looks out on such a tree. If there’s no nearby tree, we hang a picture of a tree on our wall, or find something in our home that imitates the strong verticality of a tree. A four-drawer steel filing cabinet with lamp on top could serve as the strong tree model. I sometimes think of the top drawer as my head; the second drawer as my heart and lungs; the third as my belly, kidneys and kwas; and the fourth as my legs and feet rooted in the ground. The energy of the lamp on top first melts the contents of the first drawer, which dribbles down into the second drawer, melting its contents, which oozes down into the third drawer, melting its contents, and so on.
LET’S EXPLORE standing like a tree.
Take time to scan your posture from feet to head and back down. Chris Cinnamon’s book, Tai Chi for Knee Health recommends the following steps for a “neutral posture”:
- feet parallel under hips,
- knees unlocked,
- tailbone relaxed downward,
- midriff open,
- occiput (back of head) rotated up and forward,
- ams relaxed at sides with a sense of openness in armpits,
- chest relaxed,
- back open,
- pressures in feet balanced.
- If you sense that any elements of your posture are not quite so, just notice them. “Relax your body… relax your thoughts…relax your breath.”
- Your feet are the roots of your tree, so deserve your initial attention. Are they parallel under your hips? Do you sense them rooted in the ground like a sturdy oak tree? Do you feel the force of gravity pulling them down into the earth? Do you sense the soles of your feet pulling energy up from the earth? Are the pressures in your feet balanced? Can you allow contractions in their joints and muscles to relax (not easy to do, especially for a novice).
- Your legs and torso make up the strong trunk of your tree. Are your knees unlocked? Is your tailbone relaxed downward? Is your midriff open? Is your chest relaxed and your back open?
- Your arms are the branches of your tree, free to wave in the breeze. Do they hang loosely at your sides? Have you a sense of openness in your armpits?
- We let our body decide when to stop, though we often set a goal and see if we can persevere to make it.
Standing Meditation 2. ”Holding the Orb”
“Now that your legs are stronger, you can practice a stance to strengthen your arms as well as your legs.
This is the shape for Standing Meditation 2.
Figure 4. Holding the Orb.
The “orb” of this Meditation is a large, weightless, invisible sphere that we mindfully hold in our outstretched arms and invite to fill with energetic Qi.
LET’S EXPLORE holding the orb.
- Chris Cinnamon’s neutral posture is the beginning stance.
- With no more than 70% effort, invite your arms to float up to heart height. Pour just enough extra weight onto your heels, legs, or buttocks to balance the forward weight of your arms.
- Allow your arms to form an almost full circle in front of you, as if they were embracing the trunk of a large tree.
- To complete the circle, let the middle fingers of your two hands point toward one another some 4 to 12 inches apart.
- Invite your elbows to be heavy and your hands light.
- Imagine that the orb is full of nurturing energy, healing light.
- Let your finger tips feel “perky” (full of optimistic Qi). Are you aware of a tingling, vibrating sensation in the tips of your fingers? This is your Qi, your life force.
- Let the Qi be helium-like and add “levity” (lightness) to your whole body.
- As you sense the lightness of your body, can you also feel your feet? Too much focus on the helium lightness of the body without reminders of its deep rootedness can invite dizziness.
- In time, you may feel those life force vibrations in your hands, lower arms, upper arms, shoulders, back, and deep inside your entire body. These vibrations both strengthen and tone the ligaments, muscles, tissues and sinews of your shoulders, back, and arms. Your elbows and shoulders become both softer and stronger, as does your entire body.
- Also in time, you may sense other areas in your body letting go, coming to rest: your neck and jaw, for example, or areas in your back, hips, legs, knees, and feet.
- At first, hold this stance for only about three minutes, but increase the time most days.
“Standing Meditation 3. “Holding Your Belly”
This is the shape for Standing Meditation 3
Figure 5. Holding your belly
- Start in Chris Cinnamon’s neutral posture.
- Arms take position for Holding the Orb.
- Arms relax downward to hold the orb at belly height.
- While in this position, arms and shoulders relax, hands “scoop” in a ‘not too loose, not too tight’ manner that permits Qi to flow through the wrists.
- Do you feel your feet on the ground, your head bobbilacious, and the flow of your breath out and in?
‘Bow Stance”
An especially useful TCQ stance is the “Bow Stance.” With our feet in a Bow Stance we can pour our weight back and forth from one leg to the other and, when directly over one leg, can rotate our hips from side to side along with the weight shifts. This gives our hips a far greater range of motion than having our feet hip-width and parallel.
“Cat Stance”
You may now be strong enough to stand for some minutes on one leg alone. Your unweighted foot, the “empty” one, barely touches the ground, like a cat waiting to pounce on its prey. This strengthens your “full” leg far more quickly than standing the same time on both legs. It also lets you practice emptying your unweighted leg. In time you may be able to pour all your weight into one leg as you lift the other foot 3 to 12 inches off the ground.
‘Left Bow Stance”
The Left Bow Stance is ideal for flute playing. It has the left foot forward, pointing N, and the right foot back, pointing NE. Here are directions for getting into the Left Bow Stance. The six moves numbered below are illustrated as a crib sheet in a box.
- 13.We stand in neutral posture.
- 14.With most of our weight in our left leg we pivot our right foot on its heel, turning our right toes toward the NE corner.
- 15.We pour our weight into our right leg; our left leg empties.
- 16.We invite our empty left foot to step straight forward (N), placing the heel where the toe had been.
- 17.We shift our weight onto our forward left foot.
Figure 6. Crib Sheet for Left Bow Stance
To keep the two sides of our body balanced, we practice the Right Bow Stance an equal length of time.
- Feet parallel.
- Weight moves to R foot, L foot empties.
- L foot rotates NW.
- Weight moves to L foot, R foot empties.
- R foot steps N.
- Weight moves to R foot, L foot empties.
Standing Meditation 4. “Raise Hands Right”
This is the shape for Standing Meditation 4
 Figure 7. Raise Hands Right
- Feet in Left Bow Stance (left foot front, pointing N; right foot back. pointing NE.
- Let your arms drop as in Meditation #3, “Holding Your Belly.”
- Allow your weight to shift to 70% in the right foot.
- Let your hips and torso rotate gently to the right, the momentum allowing the arms to arc up like a pendulum.
- 10.Steer the left hand up the midline, left elbow relaxed, left palm and soft wrist facing the right shoulder.
- 11.Your right arm arcs out further to the right, elbow relaxed, right wrist and fingers still rounded, and palm facing N.
Healthy Flute Posture
Now let’s morph “Raise Hands Right” into a comfortable, low-effort, and effective flute-playing posture. Only a few small changes are needed to transform Meditation #4 into a healthy flute pose.
Figure 8. Healthy Flute Posture
- 12. Stand in Meditation 4, “Raise Hands Right.”
- 13.Subtle release of elbows and shoulders downward.
- 14.Subtle flopping of right wrist, such that finger tips curve softly over imaginary flute keys, and wrist, hand and fingers appear to be resting on an orb.
- 15.Subtle rotation and flopping of left wrist such that left fingers face toward right shoulder, resting on keys of imaginary flute. as if left fingers were resting on an orb.
“Backward” Flute Posture
Now, for fun and edification, let’s reverse the directions of “Left Bow Stance” and “Raise Hands Right.” This may feel very strange, showing just how natural and comfortable our habits—whether healthy or not—become with long use, and how very unnatural and uncomfortable any changes we make at first feel. This “backward” pose helps keep the two sides of our body symmetrical.
LET’S EXPLORE “Backward”
- 16.Feet in Right Bow Stance (right foot front, pointing forward; left foot back. on diagonal.
- 17.Arms drop as in Meditation #3, “Holding Your Belly.”
- 18.Hips and torso rotate gently to the left; the hip movement arcs your arms up to the left like a pendulum.
- 19.Right hand floats forward and up just above left shoulder; right elbow relaxed, right palm and soft wrist face shoulder.
- 20.Left arm arcs out further to the left; elbow relaxed, left wrist and fingers still rounded, palm facing N.
- 21.If you have a baroque flute or any keyless transverse flute, you might experiment with playing a simple tune as you hold it to your left. (With a baroque flute you’ll need to rotate the foot joint outward about 90º in order for your left pinky to reach its single key.) (An illustration would certainly help this item, but it’s very hard for a flutist to look comfortable playing “backwards.”)
Further TCQ Benefits
Standing Meditations are only one TCQ practice of value to flutists. All TCQ practices deepen mind-body awareness (inner focus, presence, attention), active relaxation (relaxed action), and non-doing (seemingly effortless action).
Here’s a photo taken about a year ago of me and a llama. According to the internet, llamas are gentle, shy but sociable, and very curious animals, often used to shepherd flocks. Naturally calm and full of good common sense, llamas lay their ears back when agitated. This llama’s ears stand straight up, perhaps a friendly gesture? My favorite Alexander teacher calls this photo “wonderful,” especially the llama’s neck, and mine too! A retired university flute professor, who daily plays baroque flute “backward” for awhile to release his neck stiffened by a life of flute playing, considers the photo “a good advertisement for The Alexander Technique.”
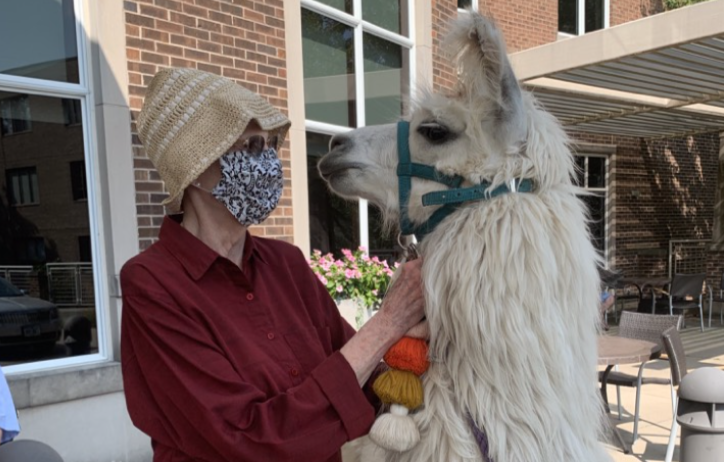 Photograph 4. Betty and Llama
In normal times, in-person tai chi classes are available in most communities of any size. Many books and articles are also available, and more are being written. Following is a list of sources I have found particularly helpful for my own posture and well-being.